



As every Kite Aerial Photography (KAP) enthusiast knows, success in the field is rarely about luck—it’s all about preparation. When planning a session based on a weather forecast, looking at wind speed and temperature is only half the battle. You also need to factor in wind direction and how to scout an optimal launch site using digital tools like Google Maps.
Let’s break down the forecast for yesterday, Sunday, August 23rd, at Saltholmen, and see how I turned these data points into a reasonably successful flight plan.
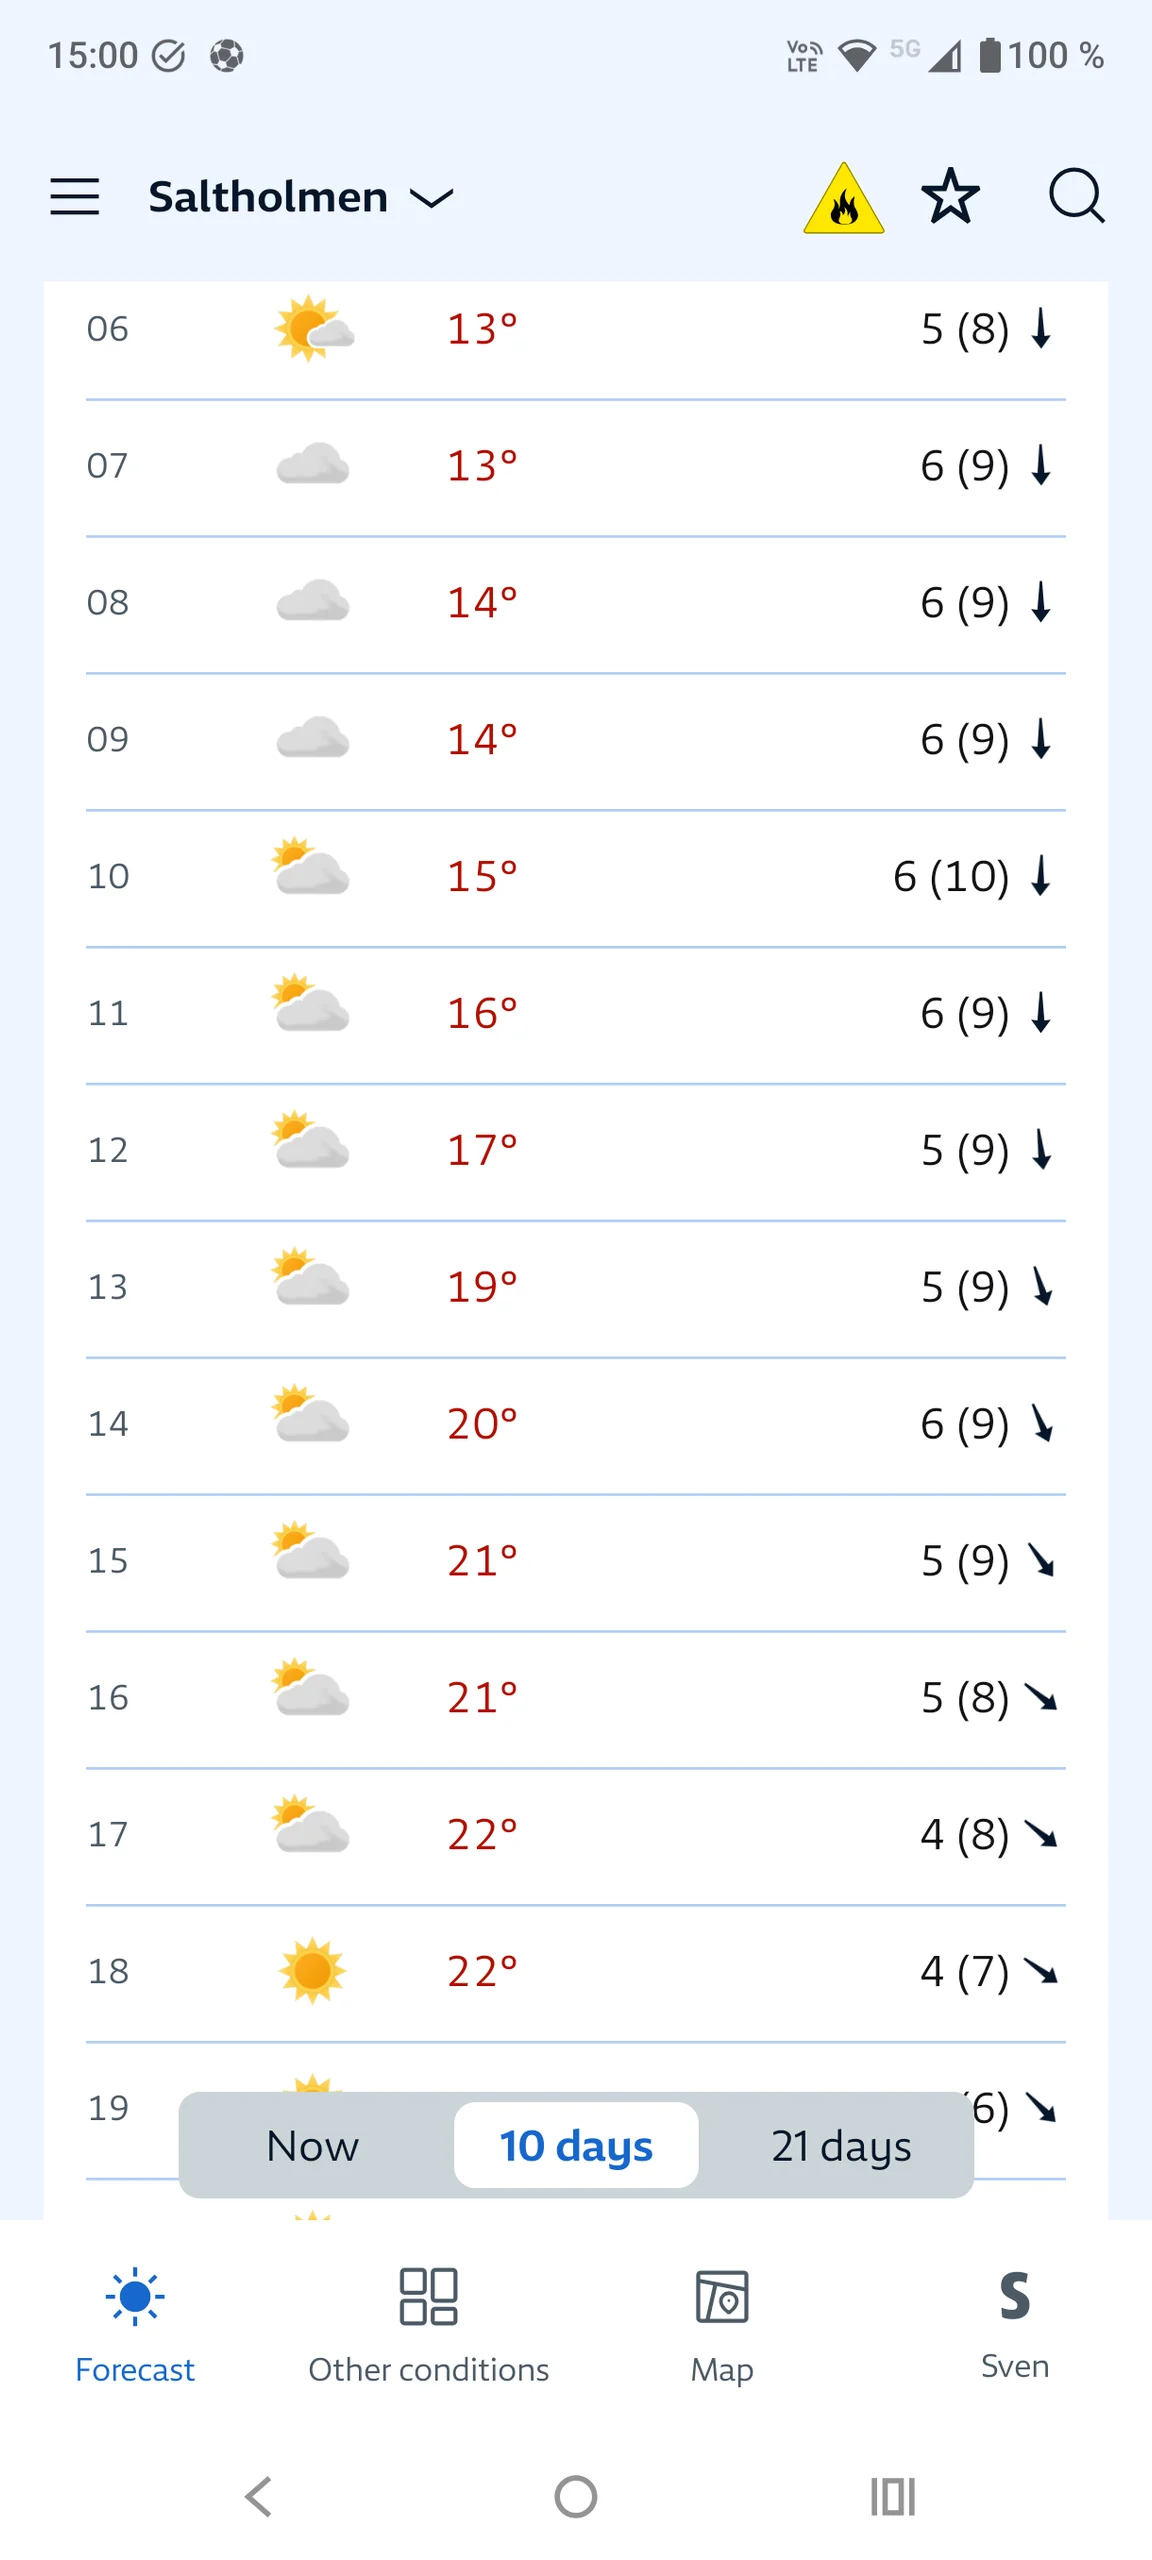
Weather Summary (August 23rd):
- Conditions: Mostly cloudy, turning brighter and warmer (up to 22°C) by afternoon.
- Wind Speed: Consistent 4–6 m/s base, with gusts up to 7–10 m/s.
- Wind Direction: Predominantly from the North/North-West (indicated by the downward/south-eastward pointing arrows).
1. Strategic Planning: Wind Speeds and Gusts
With a steady base wind of 4–6 m/s, we are in the sweet spot for medium-to-large single-line kites. However, the gusts reaching up to 10 m/s demand caution:
- Gear Resilience: Ensure your line strength and Picavet/gimbal damping systems can handle the sudden transitions between lulls and 10 m/s gusts. (I ended up using a 100kg flying line and my Power Sled 36 for my KAP session yesterday.)
- Camera Settings: As the day brightens up to 22°C, manage your exposure carefully. Using ND filters will help control the brighter afternoon light and maintain optimal shutter speeds. (I ended up using a CPL filter for my KAP session yesterday.)
2. Navigating Wind Direction: Why North/North-West Matters
The forecast arrows clearly show a North to North-West wind (blowing from NNW towards SSE). In kite flying and KAP, wind direction dictates everything:
- Clear Fetch: Wind coming from the North/North-West means you need an open fetch from that direction. If you launch right under the lee of a high cliff, hill, or dense forest to your north, you will experience severe turbulence and rotor effects that can destabilize or crash your rig.
- Open Water or Clear Coastlines: Coastal locations like Saltholmen often offer clean, uninterrupted airflow from sea to land when the wind blows off the water, minimizing mechanical turbulence.
3. Scouting Launch Sites Using Google Maps
When dealing with an NNW wind, finding a flying field or coastal spot that avoids obstacles upwind is critical. Here is how I use Google Maps to scout my location effectively:
- Check the Upwind Fetch: Zoom in on the area directly to the North and North-West of your prospective launch site. Look for tall buildings, dense forests, or steep terrain upgrades within 200–500 meters upwind. These will create turbulent air pockets (“rotor zones”).
- Prioritize Open Water or Flat Shorelines: Use Google Maps’ satellite view to identify open coastlines, flat beaches, or large grassy fields where the NNW wind can flow smoothly with minimal disruption before hitting your kite.
- Evaluate Launch and Recovery Space: Ensure the site has enough clear downwind space (to the South/South-East) so you can safely launch, walk out your line, and recover your rig without getting tangled in trees, power lines, or obstacles.
Final Checklist for the Saltholmen Session
| Planning Phase | Key Action |
| Wind Analysis | Prepare for 4–6 m/s base with 10 m/s gusts; check line strength. |
| Direction Strategy | Account for NNW flow; avoid flying downwind of major obstacles. |
| Google Maps Scouting | Verify a clean upwind fetch (NNW) and safe downwind recovery room. |
| Timing | Target the 12:00–16:00 window for stable warmth and optimal light. |
Analyze the skies, scout smart on the map, and enjoy the flight!